SeaGreen
Create Online Forms, Databases and Admin Modules with Zero Programming
SeaGreen

After you've installed SeaGreen you should find using the tool straightforward.
You can use the tips below to get the most out of the application.
Top Tips on Getting Started Using SeaGreen
1. Designing the Look and Feel of Your Web Form
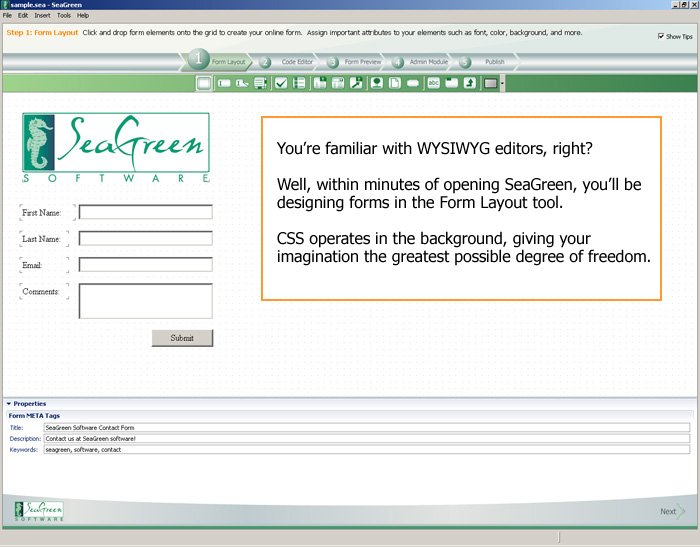
With SeaGreen, designing the layout of your web form is as easy as dragging, dropping, and resizing elements with your mouse!
The Form Layout tab presents you with a blank workspace and a row of elements most commonly used in every web form. Everything that you need to design your form is right here – text boxes, list boxes, radio groups, buttons, text, and images. Just click on the icon representing the element that you wish to use, then use your mouse to draw that element onto your workspace.
As you place each element into the workspace, SeaGreen will present you with a Properties window which occupies the lower third of the screen. Here, you will designate names for each element, as well as visual properties such as colors, fonts, and more. The available properties will vary based on the type of element that you have selected.
Using a combination of elements, placement, and color, you’ll find designing web forms in SeaGreen to be an amazingly easy departure from the usual grind of manual coding.
2. Working With The Code Editor
Those of you who are familiar with HTML code will appreciate SeaGreen’s Code Editor tab. As you build your web form in the Form Layout tab, SeaGreen keeps pace, populating the necessary HTML code to make your form come alive. At any time, you may click on the Code Editor tab to see how your HTML code looks, make quick adjustments manually, or educate yourself on how different form elements are implemented as. Note that since SeaGreen writes code on the fly, if you make changes to your form via the form layout tab, any custom code will be overwritten.
3. Using Preview to Avoid Surprises
As intuitive as the Form Layout editor may be, from time to time you will want to see how your form will look to visitors of your website. Click on the Form Preview tab to get an instant view of your form as it will appear in a browser. This is a good chance to see how your colors will be rendered, and to see if your original layout needs some adjustment.
You should note that you also have the option of previewing your web form in a specific browser. To do this, click on File, then on Preview in Browser. SeaGreen presents you with a list of installed browsers – just click on your preferred browser to load the form.
Reminders are available in several types, including meetings, phone calls, and other personal notes, and can be further annotated with specific date and timestamps.
4. Creating Your Administrative Module
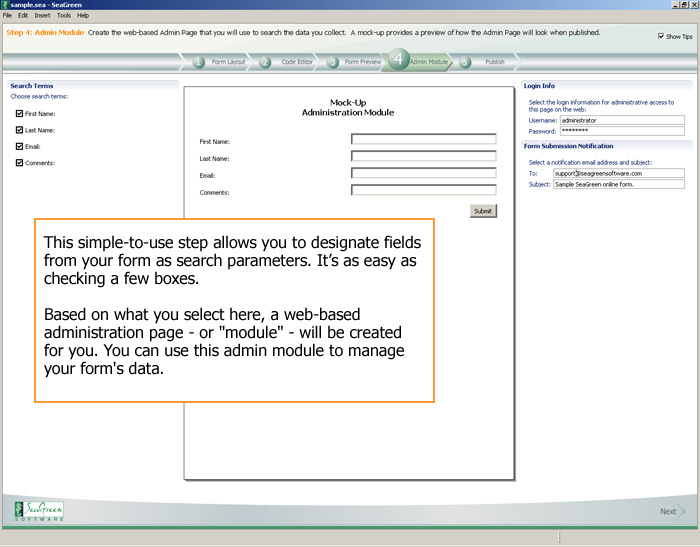
All of the information that you collect using the forms that you’ve created in SeaGreen is stored in a database that is accessed using a password-protected web interface. SeaGreen lets you select which form fields can be used to search your database, giving you the flexibility to perform broad queries as well as queries that are narrowly tailored to produce very specific results. To select the form fields that will be stored by the database, you use the Admin Module tab.
The Admin Module tab automatically loads every form element that you’ve placed on the Form Layout workspace. The default search option requires only a date range for record entry. To add more form elements, just check the box next to each, and data collected by those fields will be stored in the database. You may choose not to store data for certain elements that will never be the subject of a query, such as static text boxes.
On the right side of the screen, you may specify a username and password to access this administrative module, as well as the settings governing the email submission of all data collected by the form. Many sites opt to redirect visitors to a Thank You page after they have submitted a completed form – you may implement this functionality by entering the URL of the Thank You page here.
5. Publishing Your Finished Form
SeaGreen boasts an integrated FTP client that you use to copy your files to your web server. Using the Publish tab, all you need to do is enter your login credentials and SeaGreen will assist you in uploading your completed form to the server. Once you have entered your info, click ‘Connect’. SeaGreen will use your supplied credentials to open a connection to your web server and navigate to the specified directory for publication. Once the connection is established, click on ‘Publish’ to have SeaGreen transfer your completed form to your web server, set up the necessary files, and build your database.
Be sure to fill out the information under Database Info on this screen. SeaGreen stores all of the data received via the form in a database, but it’s up to you to designate a name and a host for this database, as well as login credentials. These are the parameters that SeaGreen will use when setting up your database for the first time.