I.
There are two tabs in the main
application window:
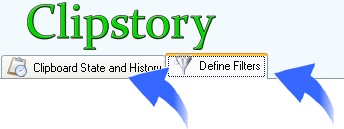
- one tab page is called "Clipboard State
and History" - for the usual Clipboard activities like handling the Clipboard
History, managing the current state of the Clipboard and viewing Clipboard
elements. - one tab page is called "Define Filters"
in which you can define filters or listeners which come into play when a new
clipboard element appears in the Clipboard.
II. "Clipboard State and
History" tab contains:
a. The command bar for the Clipboard State
which can:
-
 load Clipboard
State elements from file (Clipstory's own format) using the "Load From File"
button.
load Clipboard
State elements from file (Clipstory's own format) using the "Load From File"
button.
-
 save Clipboard
State elements to the default file (Clipstory's own format) using the "Save
Clipboard" button.
save Clipboard
State elements to the default file (Clipstory's own format) using the "Save
Clipboard" button.
-
 save a copy
of the Clipboard State elements to a file you select from the disk. The format
of the file is Clipstory's own format.
save a copy
of the Clipboard State elements to a file you select from the disk. The format
of the file is Clipstory's own format.
-
 removes
all elements from the Clipboard.
removes
all elements from the Clipboard.
-
 makes the
Clipboard State invisible and then the button turns itself into
makes the
Clipboard State invisible and then the button turns itself into
 . Pressing the
makes the Clipboard
State visible again and the button turns itself into a
.
. Pressing the
makes the Clipboard
State visible again and the button turns itself into a
.
-
 switches the
position of the Clipboard State command bar with the Clipboard State container
section. Then the button turns itself into a
switches the
position of the Clipboard State command bar with the Clipboard State container
section. Then the button turns itself into a
 . If this is
pressed again then it switches the position of the Clipboard State container
section with the Clipboard State command bar and turns itself into a
.
. If this is
pressed again then it switches the position of the Clipboard State container
section with the Clipboard State command bar and turns itself into a
.
b. The Clipboard State shows the actual elements
in the Clipboard
Please notice that there can be more than one element in the Clipboard
(different formats).
- the
button allows
you to save only that Clipboard element to a file you select.
- the
 button shows
the contents of the selected clip in the Clipstory main viewer.
button shows
the contents of the selected clip in the Clipstory main viewer.
c. The Bottom section of Clipstory (first
tab) contains the Clipboard Section and the Clip information section
- the
 button
partially hides the Clipboard History section horizontally. If pressed once will
transform into the
button
partially hides the Clipboard History section horizontally. If pressed once will
transform into the
 button which
shows the Clipboard History section horizontally.
button which
shows the Clipboard History section horizontally.
- the
 button hides the
Clipboard History section vertically. If pressed once will transform into the
button hides the
Clipboard History section vertically. If pressed once will transform into the
 button which
shows the Clipboard History section vertically.
button which
shows the Clipboard History section vertically.
- the
button loads
Clipboard History elements from a file to which you previously saved Clipboard
History elements using the
button.
- the
button saves
the Clipboard History elements to the default file. From the default file, the
Clipboard History items are saved when Clipstory closes and are loaded when
Clipstory starts
- the
button saves
the Clipboard History elements to a file of your choice. Then you can use the
button to load
the Clipboard History elements from that file.
- the
button
clears all the Clipboard History elements stored in Clipstory. A question will
popup up first and if you agree then all elements are deleted.
- the
 button enables you to search a text you enter in the search box above this
button. If a matching history element is found among the Clipboard History
elements then that history element will have its Type value coloured in Red:
TEXT, BITMAP, AUDIO, FILES, BINARY.
button enables you to search a text you enter in the search box above this
button. If a matching history element is found among the Clipboard History
elements then that history element will have its Type value coloured in Red:
TEXT, BITMAP, AUDIO, FILES, BINARY.
- the
 button clears the search results by turning all Clipboard History elements from
red to black.
button clears the search results by turning all Clipboard History elements from
red to black.
- you can also increase/decrease horizontally the History
section as much as you like, making more space for the clip viewers
- the TEXT/HTML, FILE and BINARY viewers have a scroll bar
at the right of the screen which you can use to set the magnification of the
viewers content: this way you can zoom in on the text/html, files, binary
content.
- right clicking on any of the Clipboard History elements
will popup the following contextual menu:
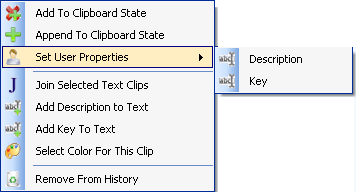
- the Description and Key options can be used to enter a
text for the selected Clipboard History element. This text can then be seen in
the lower section of the Clip Information section (the Clipstory viewer).
- the "Remove From History" option removes the selected
item from the Clipboard History section
- the "Add To Clipboard State" option adds the
selected item from the Clipboard History section to the Clipboard State. But
first the Clipboard State (the Clipboard) is cleared and then the element is
added.
- the "Append To Clipboard State" option appends
the selected item from the Clipboard History section to the Clipboard State.
This means that if other elements (except a Binary clip element) exists in the
Clipboard State (in the Clipboard) then those elements stay in the Clipboard
State (in the Clipboard) and the new element is added to it.
- the "Join Selected Text Clips" option should be accessed
after selecting at least two TEXT clips from the History section. It will create
a new Text clip which will contain the contents of the selected clips joined
together.
- the "Add Description to Text" option adds the
description field of a TEXT clip to the actual content of that TEXT clip.
- the "Add Key to Text" option adds the key field of a
TEXT clip to the actual content of that TEXT clip.
- the "Select Color for This Clip" option allows the
selection of a color for the currently selected clip or clips from the History
section.
Note: A Binary element exists on its own in the Clipboard State
because it is usually built from several other "unknown" clipboard elements.
"Unknown" here means that the clip is not a TEXT, HTML, IMAGE, FILE or AUDIO
clip.
III. "Define Filters" tab:
a. allows you to define
listeners:
What are the listeners (or the filters)?
A listener (or a filter) is basically and entity you define
which is capable of handling clipboard elements of the listener's type.
General things about listeners:
Usually you define listeners for storing clipboard elements in a
custom file.
You are in charge of defining your own listeners.
There can be more listeners of the same type (as many as you
want).
Each window in which you define listeners has
STEPS marked in red helping you with the next step
in the listener definition..
Each listener can be disabled using the "Enabled" checkbox in
the listener definition window.
All listener types (except TEXT) make use of pattern fields:

This means that when defining a listener you will need to
specify a file name or folder name in which to store the Clipboard elements
(images, audios, binaries, files and html pages). You can use one of these
fields to specify the file/folder name and these fields will be replaced by
their actual meaning:
- &DAY - will be replaced by the current day
- &MONTH - will be replaced by the current
month
- &YEAR - will be replaced by the current
year
- &GUID - will be replaced by a unique
identifier which is a random 32 character text
- &NEXTNUMBER - will be replaced by the next
number which should be used for that Clipboard element. This way you can have
files names like the following: imageFromClipboard_1.html,
imageFromClipboard_2.html, imageFromClipboard_3.html and so on.
b. contains the Command section for defining
and handling the listeners:
The add listener commands are straight forward.
The Load/Save/Remove/Clear commands affect the existing listeners.
c. contains a list with all the listeners you define:
d. Presenting the listeners:
Text Listener
A text listener is handling all Clipboard Text elements by
copying them to to a custom file which you specify in the listener's definition
window:
Web Page Listener
A Web Page listener is handling all Clipboard Html elements by
copying them to a specified folder under the specified file name (specified by
pattern).
Audio Listener
An Audio listener is handling all Clipboard Audio elements by
copying them to a specific folder under a specified file name (specified by
pattern).
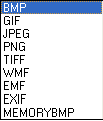
Image Listener
An Image listener is handling all Clipboard Image elements by
copying them to a specific folder under a specified file name (specified by
pattern).
You can specify the format under which the listener is going to
to save the images :
Binary Listener
A Binary listener is handling all Clipboard Binary ("unknown")
elements by copying them to a specific folder under a specified file name
(specified by pattern).
File Listener
A File listener is handling all Clipboard File elements by
copying them physically (or just creating a file name) in a specific folder. The
folder name can be specified either simply in the "Folder (Full Path)"
field or by using a pattern folder like bellow (look at the "Folder Name
(pattern)" field):
IV.
Application Settings
a. General Information
The "Save" button at the top saves all existing settings from
all tabs in the Settings window.
Individual "Save" buttons (from each tab) save only the setting
existing in the tab the "Save" button exist.
b. Keyboard settings:
Here you can define your own key combinations or use the default
ones to access the stored items in the application's History:
- CTRL + SHIFT
+ C - adds item from History to Clipboard State. First clears Clipboard content
then adds element to Clipboard.
- CTRL + SHIFT
+ A - appends item from History to Clipboard (existing elements are also
maintained).
- CTRL + SHIFT
+ I - shows the current Clipboard State
- CTRL + SHIFT
+ L - clears the Clipboard State
- CTRL + SHIFT
+ UP - goes to the next element (upwards) in the Clipboard History
- , CTRL +
SHIFT + DOWN - goes to the next element (downwards) in the Clipboard History
In this window there is also a checkbox called: "Browse
Clipboard History and automatically add selected history element to Clipboard
state" which is used to add elements to clipboard as you are browsing the
Clipboard History.
c. Application Settings
Contains general application settings:
- the "Start Clipstory on System Startup
Minimized" option allows starting Clipstory minimized in the System tray at
System Startup. This option does not need the "Save" button to be pressed.
- the "Hovering over ..." options control
what will be seen when you hover over the Clipstory tray icon: the "Clipboard
State" or the "History" current selection. This option does need the save button
to be pressed in order for the changes to take effect.
d. Clipboard Behaviour
Contains the "Read HTML from
Clipboard" option which specifies whether to consider Web Page elements or not
when pressing: CTRL+A and the CTRL+C in the browser. If this option is unchecked
then only the TEXT from the Web Page is considered when pressing CTRL+A and the
CTRL+C in the browser.
e. Audio Settings
Allows you to define the sounds which
to be played when a new clip is added to Clipstory. There is already a default
sound that comes with Clipstory installation and is called "DingLing.wav". This
sound can be replaced by using the Browse button and selecting another sound
file. Clipstory understand "wav" files.
- the
 button
restores the selection to the "DingLing.wav" sound file which comes with the
Clipstory installation.
button
restores the selection to the "DingLing.wav" sound file which comes with the
Clipstory installation.
- the
buttons can be
used to male the same sound file selection for the previous and next clip items.
For example if we have something selected in the HTML item sound file box then
we can use the up and down buttons to make the same selection in the TEXT (use
the Up button) and the IMAGE (use the Down button) clips.
- the
 button is
used to remove the current sound file selection.
button is
used to remove the current sound file selection.
Go To Top